
This guide will show you how to bake-in texture details and convert from different modern 3D materials to a goldsrc model. This also touches on some topics about porting and additional 3D work. This guide will be heavy on some materials theory as you need to properly understand in order to do your materials and lighting setup properly.
Table of Contents:
Part 1: Old Era Materials overview
Part 2: New Era Materials (PBR) overview
Part 3: Examples and Considerations
Part 4: Baking in 3dsmax
Part 5: Baking in Blender
Part 6: Other Programs
Part 7: Mixing Maps/Post process
Part 1: Old Era Materials overview
Traditional era materials used for the most part 3 main maps:
Diffuse - The Main color texture, usually has Ambient Occlusion and sometimes other lighting effects overlaid into it
Specular - Defines the shiny or reflective parts of the model. A greyscale image, or tinted to change the color tint. In Source engine its greyscale and specular tint can only be changed per-material. Specular maps in old era do not blur reflections/cubemaps. Phong tinting can be changed though.
Normal Map - Defines details baked from a high definition model or generated. Stores tangent normal directions in each color channel: Red = X Green = Y Blue = Z. In some engines is reffered to as a "Bump map" but can have conflicting terminology.
Those cover the main ones but some additional ones to know of are:
Exponent - Used for source engine to make phong highlights soft or sharp
Phong Mask - Defines the amount of phong highlights used or hidden
Bump Map - Found in much older games: A grayscale image that defines bump detail that is only up or down; because of this limitation they were only used for shallow/small details. These were replaced by normal maps which define all XYZ directions and can fake much better details.
Emission/Glow - Defines the amount the texture glows
Opacity/Transparency - Defines Transparency
Part 2: New Era Materials (PBR) overview
PBR or Physically Based Rendering is the modern method of doing materials. There are actually 2 main workflows for PBR which is Metalness and Specular, but Metalness is the most commonly used. I won't go into the detailed technical explanations for it but if you would like some reading on the topic these articles I can reccomend:
Marmoset: Basic theory of physically based rendering
Marmoset: Physically based rendering and you can too!
PBR Metalness Workflow Materials:
Albedo - The Main color texture basically the "pure color" of the material without shadow or highlight. Brightness value is tied to real-world values and there are charts and resources for these values. In metalness workflow the color also defines reflective tint.
Roughness - Greyscale map that defines how rough an object is. Black = polished mirror, White = Rough non-shiny. It has a dual purpose of how much reflection and how blurred the reflection is
Normal Map - Defines details baked from a high definition model or generated. Stores tangent normal directions in each color channel: Red = X Green = Y Blue = Z. In some engines is reffered to as a "Bump map" but can have conflicting terminology.
Metalness - Defines if the material is a metal or not. Generally a black and white mask, greys/inbetweens are only used on transitions like corroding metal.
The biggest difference between Metalness & Specular is how the diffuse and reflectivity is defined in the maps. In the specular workflow, these values explicitly made with two texture maps.
PBR Specular Workflow Materials:
Albedo - The Main color texture basically the "pure color" of the material without shadow or highlight. Brightness value is tied to real-world values and there are charts and resources for these values. In Specular workflow however, the values for reflections are not based on the albeto but in the specular map
Specular - Color image that defines how reflective and the reflective tint of the object is
GlossynessGreyscale map on how rough an object is, its tint value and how blurry the reflections are. Map is authored as the inverse to Roughness
Normal Map - Defines details baked from a high definition model or generated. Stores tangent normal directions in each color channel: Red = X Green = Y Blue = Z. In some engines is reffered to as a "Bump map" but can have conflicting terminology.
Those cover the main ones but some additional ones to know of are:
AO (Ambient Occlusion) Greyscale image of occlusion shadows
Emission - Defines the amount the texture glows
Opacity - Defines Transparency
It should also be known many models from other engines or workflows may have thier texture maps packed together. For example something made from UNITY tends to have the roughness, AO, and metalness channel-packed into one image. This requires either a 3d editor special node setup or manually separating the maps.
Placeholder text https://marmoset.co/posts/pbr-texture-conversion/
Part 3: Examples and Considerations
Placeholder text
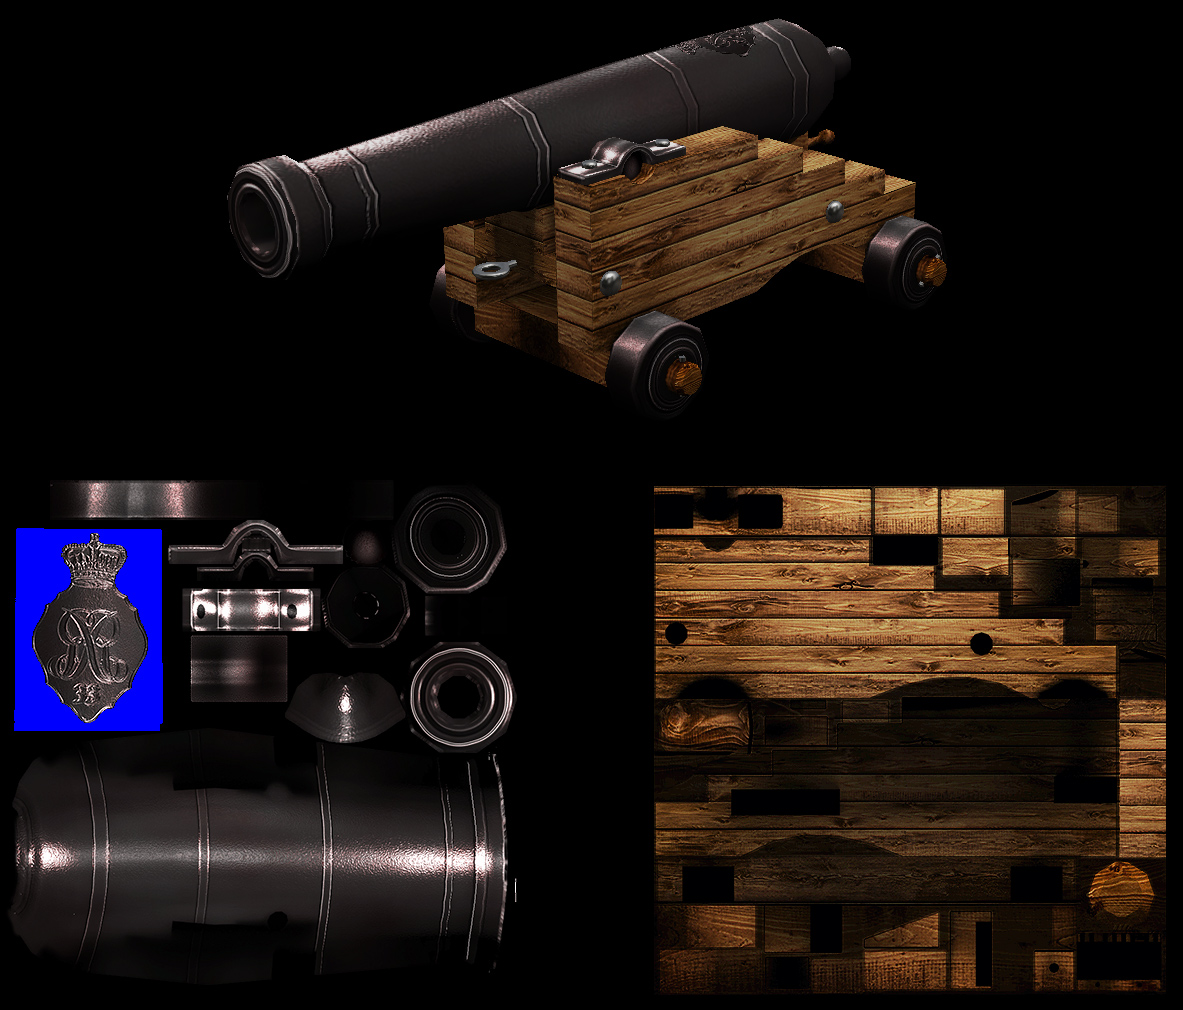
Cannon Model by The303: Two 512x512 maps, one for wood another for metallic parts. I used a mask for the emblem to have a higher resolution detail over the gun barrel, this was done by floating a piece of geometry above and having it in masked transparency mode. A CHROME mode texture was used for the small metal details for dymnamic detail.
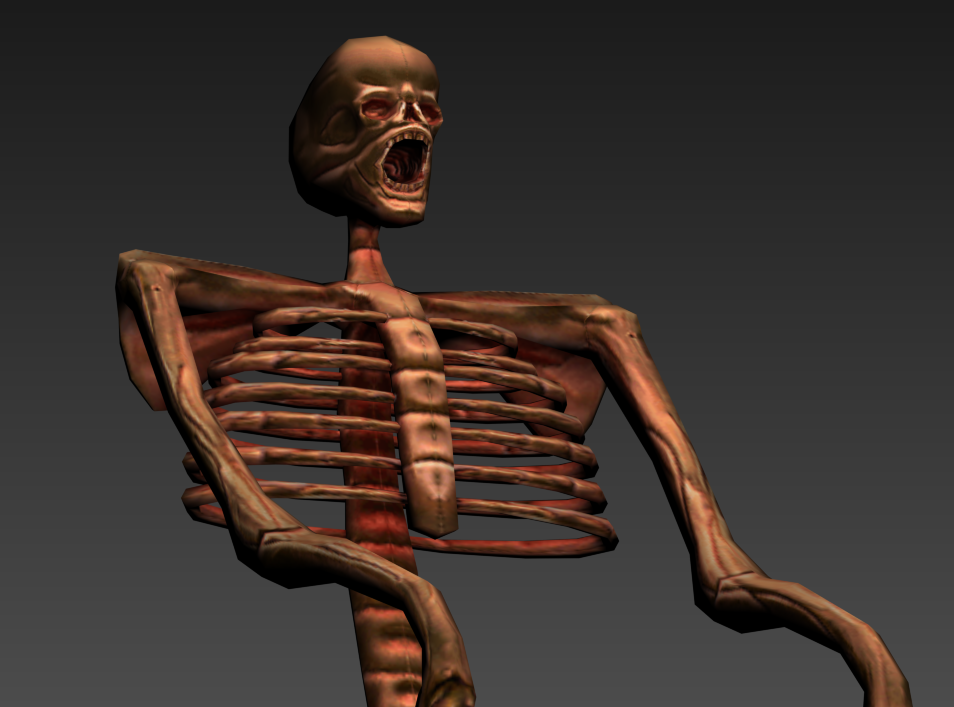
Skelechair Model by The303: One 512x512 map. Used sculptris to make a high detail sculpt which was baked onto a lowpoly model. UVs were mirrored to save on detail
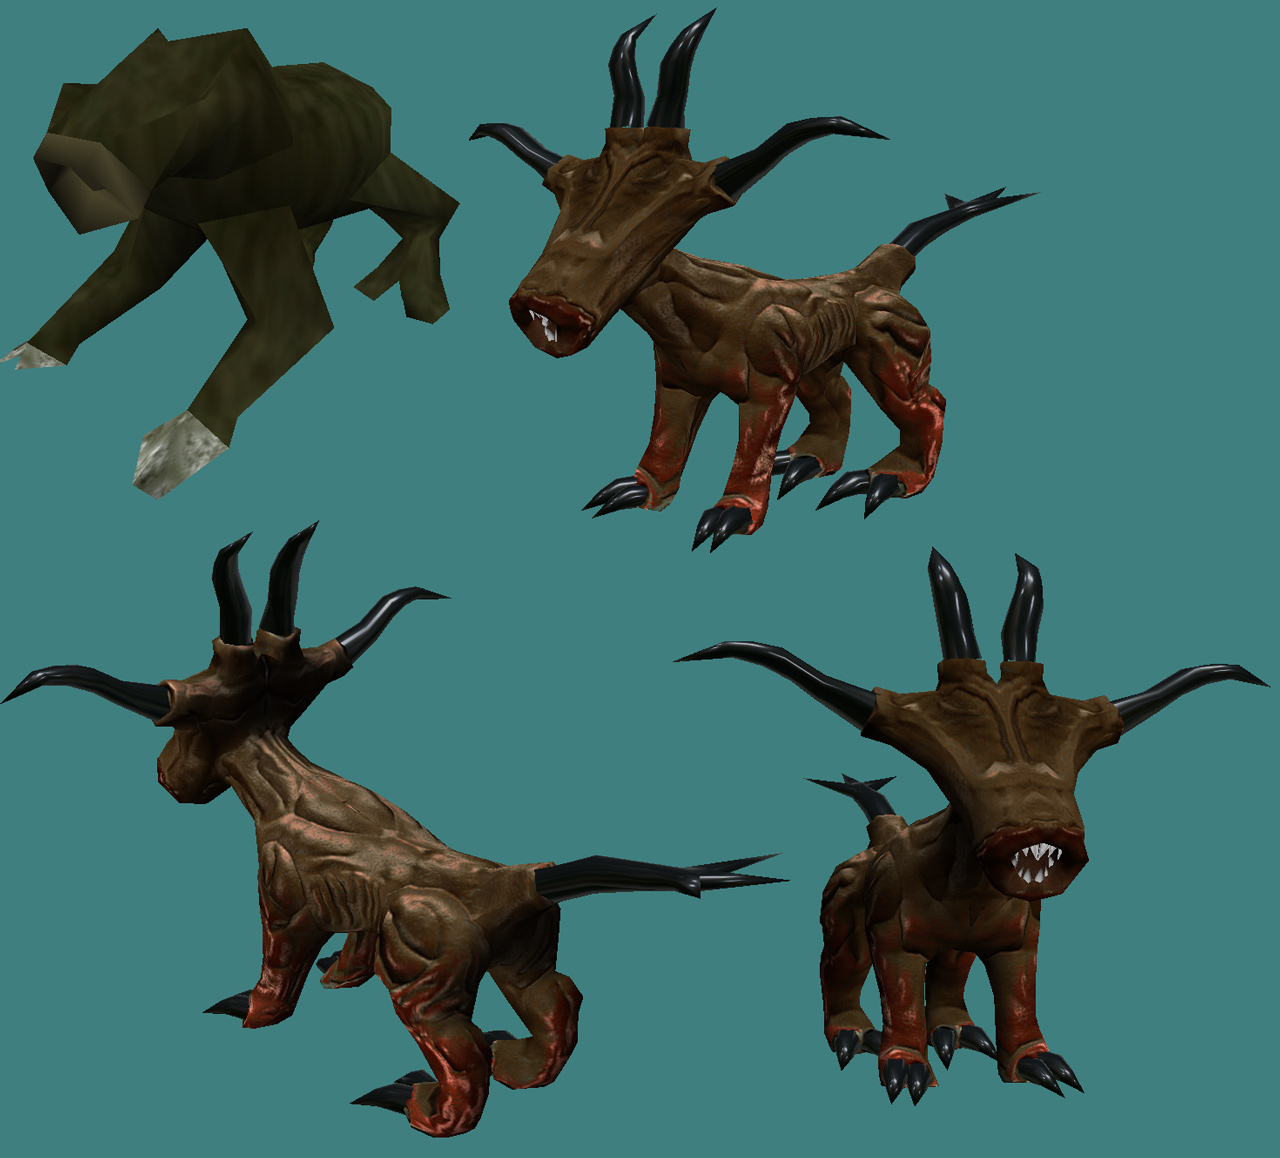
"Crabdog" Model by The303: One 512x512 map and one CHROME mode texture. Used sculptris to make a high detail sculpt which was baked onto a lowpoly model. UVs were mirrored to save on detail.
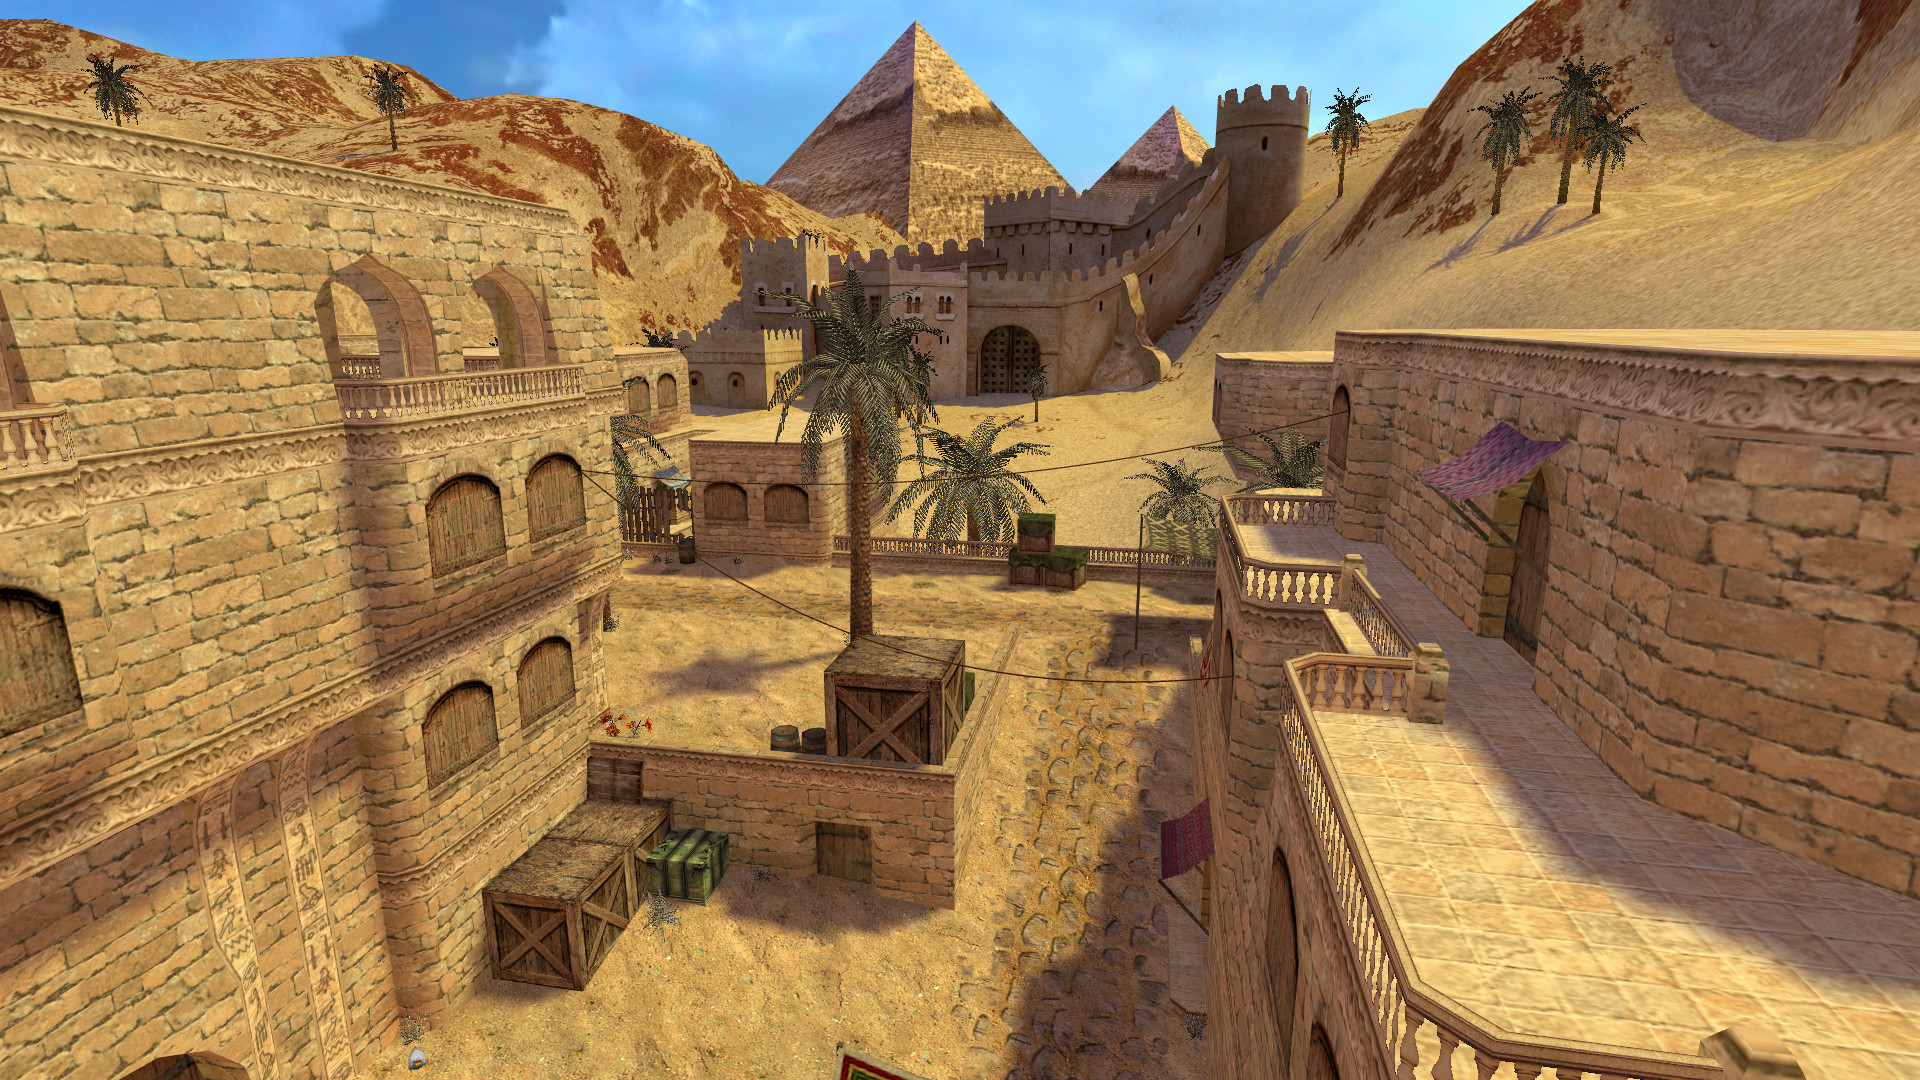
"de_dust2020" A Counter-Strike 1.6 map by seedee, uses extensive environment props with baked-in lighting as well as some CHROME shells for certain model props.
Keep in mind that GoldSrc does have 4 special texture modes avalible to you so you need to decide what also can be used:
Chrome: Simple environment map for metal like textures.
Additive: blending mode for effects like glows (pure black is hidden and lighter is visible)
Masked: Simple 1-bit transparency mask defined by a pallete index. This more commonly known as alphatest.
Flatshade: Ignores vertex normals shading all polygons uniformly without visible shadows. Best use for stylized pained shadows models/cartoon/anime style.
Sven-Coop & Xash3d have an additional flag called "Fullbright" however I cover that in a separate tutorial found here.
Part 4: Baking in 3dsmax
1) If your model uses modern PBR textures use this PBR node setup. If you don't have your maps baked and have a highpoly and lowpoly, you will generate them in step 4. Set your Rendering engine to V-Ray (or whatever your preference)
2): Set up your environment map in 3dsmax PLACEHOLDER
3) Set up some scene lights to light your model. These can be pretty much whatever configuration you want but the goal is to have subtle lighting for an animated model, with less harsh shadows and highlights. This is because you can have issues when the model moves such as too dark shadows under arms/legs or highlights/brightspots that look wierd. If its a static environment prop or model then you can do whatever.
Personally I like to have a very uniform configuration of lights and spotlights that are equal distance and pointing towards the model.
3a) IF you are baking a large environment setpiece you will have to UV-chop the model PLACEHOLDER
4a) Open the "Render To Texture" window and render these out:
-Complete Map
4b) If you are baking a highpoly to a lowpoly then you will need to bake check the "Projection Cage" option and have the model have a "Projection" modifier enabled to choose the highpoly: -Complete Map -normal map -Ambient Occlusion (If this doesn't show up in the list then Switch to V-Ray)
5)When you have your maps baked out, skip to Part 7: Mixing Maps/Post process
.
Part 5: Baking in Blender
Out of the Box blender baking can be pretty convoluted so I reccomend using TexTools Plugins.
1) If your model uses modern PBR textures use this Principled BSDF node setup. If you don't have your maps baked and have a highpoly and lowpoly, you will generate them in step 4.
Placeholder
2): Set your project to Cycles, then open your shader tab and switch from Object to World mode. Place an "Environment Map" node, choose your environment map image/HDR and connect it tothe background node. Then place a mapping node, and plug the vector output from that into the vectori input of the environment map node. After that, make a texture coordinate node and plug the "generated" to the mapping node vector input. This will allow you to rotate the environment map as you please.
The background node can be increased or decreased to affect the brightness of the Environment
3) Set up some scene lights to light your model. These can be pretty much whatever configuration you want but the goal is to have subtle lighting for an animated model, with less harsh shadows and highlights. This is because you can have issues when the model moves such as too dark shadows under arms/legs or highlights/brightspots that look wierd. If its a static environment prop or model then you can do whatever.
Personally I like to have a very uniform configuration of lights and spotlights that are equal distance and pointing towards the model.
3a) IF you are baking a large environment setpiece you will have to UV-chop the model PLACEHOLDER
4a) Open the UV editor tab and expand the TexTools window. If you already have your maps, then just select the model and set the texture resolution to 512x in the window. Then render these maps: Combined Map (optional) Paint Base
4b) If you are baking a highpoly to a lowpoly then you will need to bake out these maps:
Combined Map
Normal Map
Ambient Occlusion
5) When you have your maps baked out, skip to Part 7: Mixing Maps/Post process
.
Part 6: Other Programs
xNormal: A free standalone baking program that can be obtained from the official site. This program can bake out all the maps you need with just needing to load the OBJ or FBX model and setting the formats. Cannot bake out lighted models/scene lights.PLACEHOLDER
Shadermap4: Similar to xNormal but has more modernized features. Like xNormal it can't bake scene lights.PLACEHOLDER
Substance Painter: Has a texture baking mode but can be a bit limited PLACEHOLDER
Part 7: Mixing Maps/Post Process
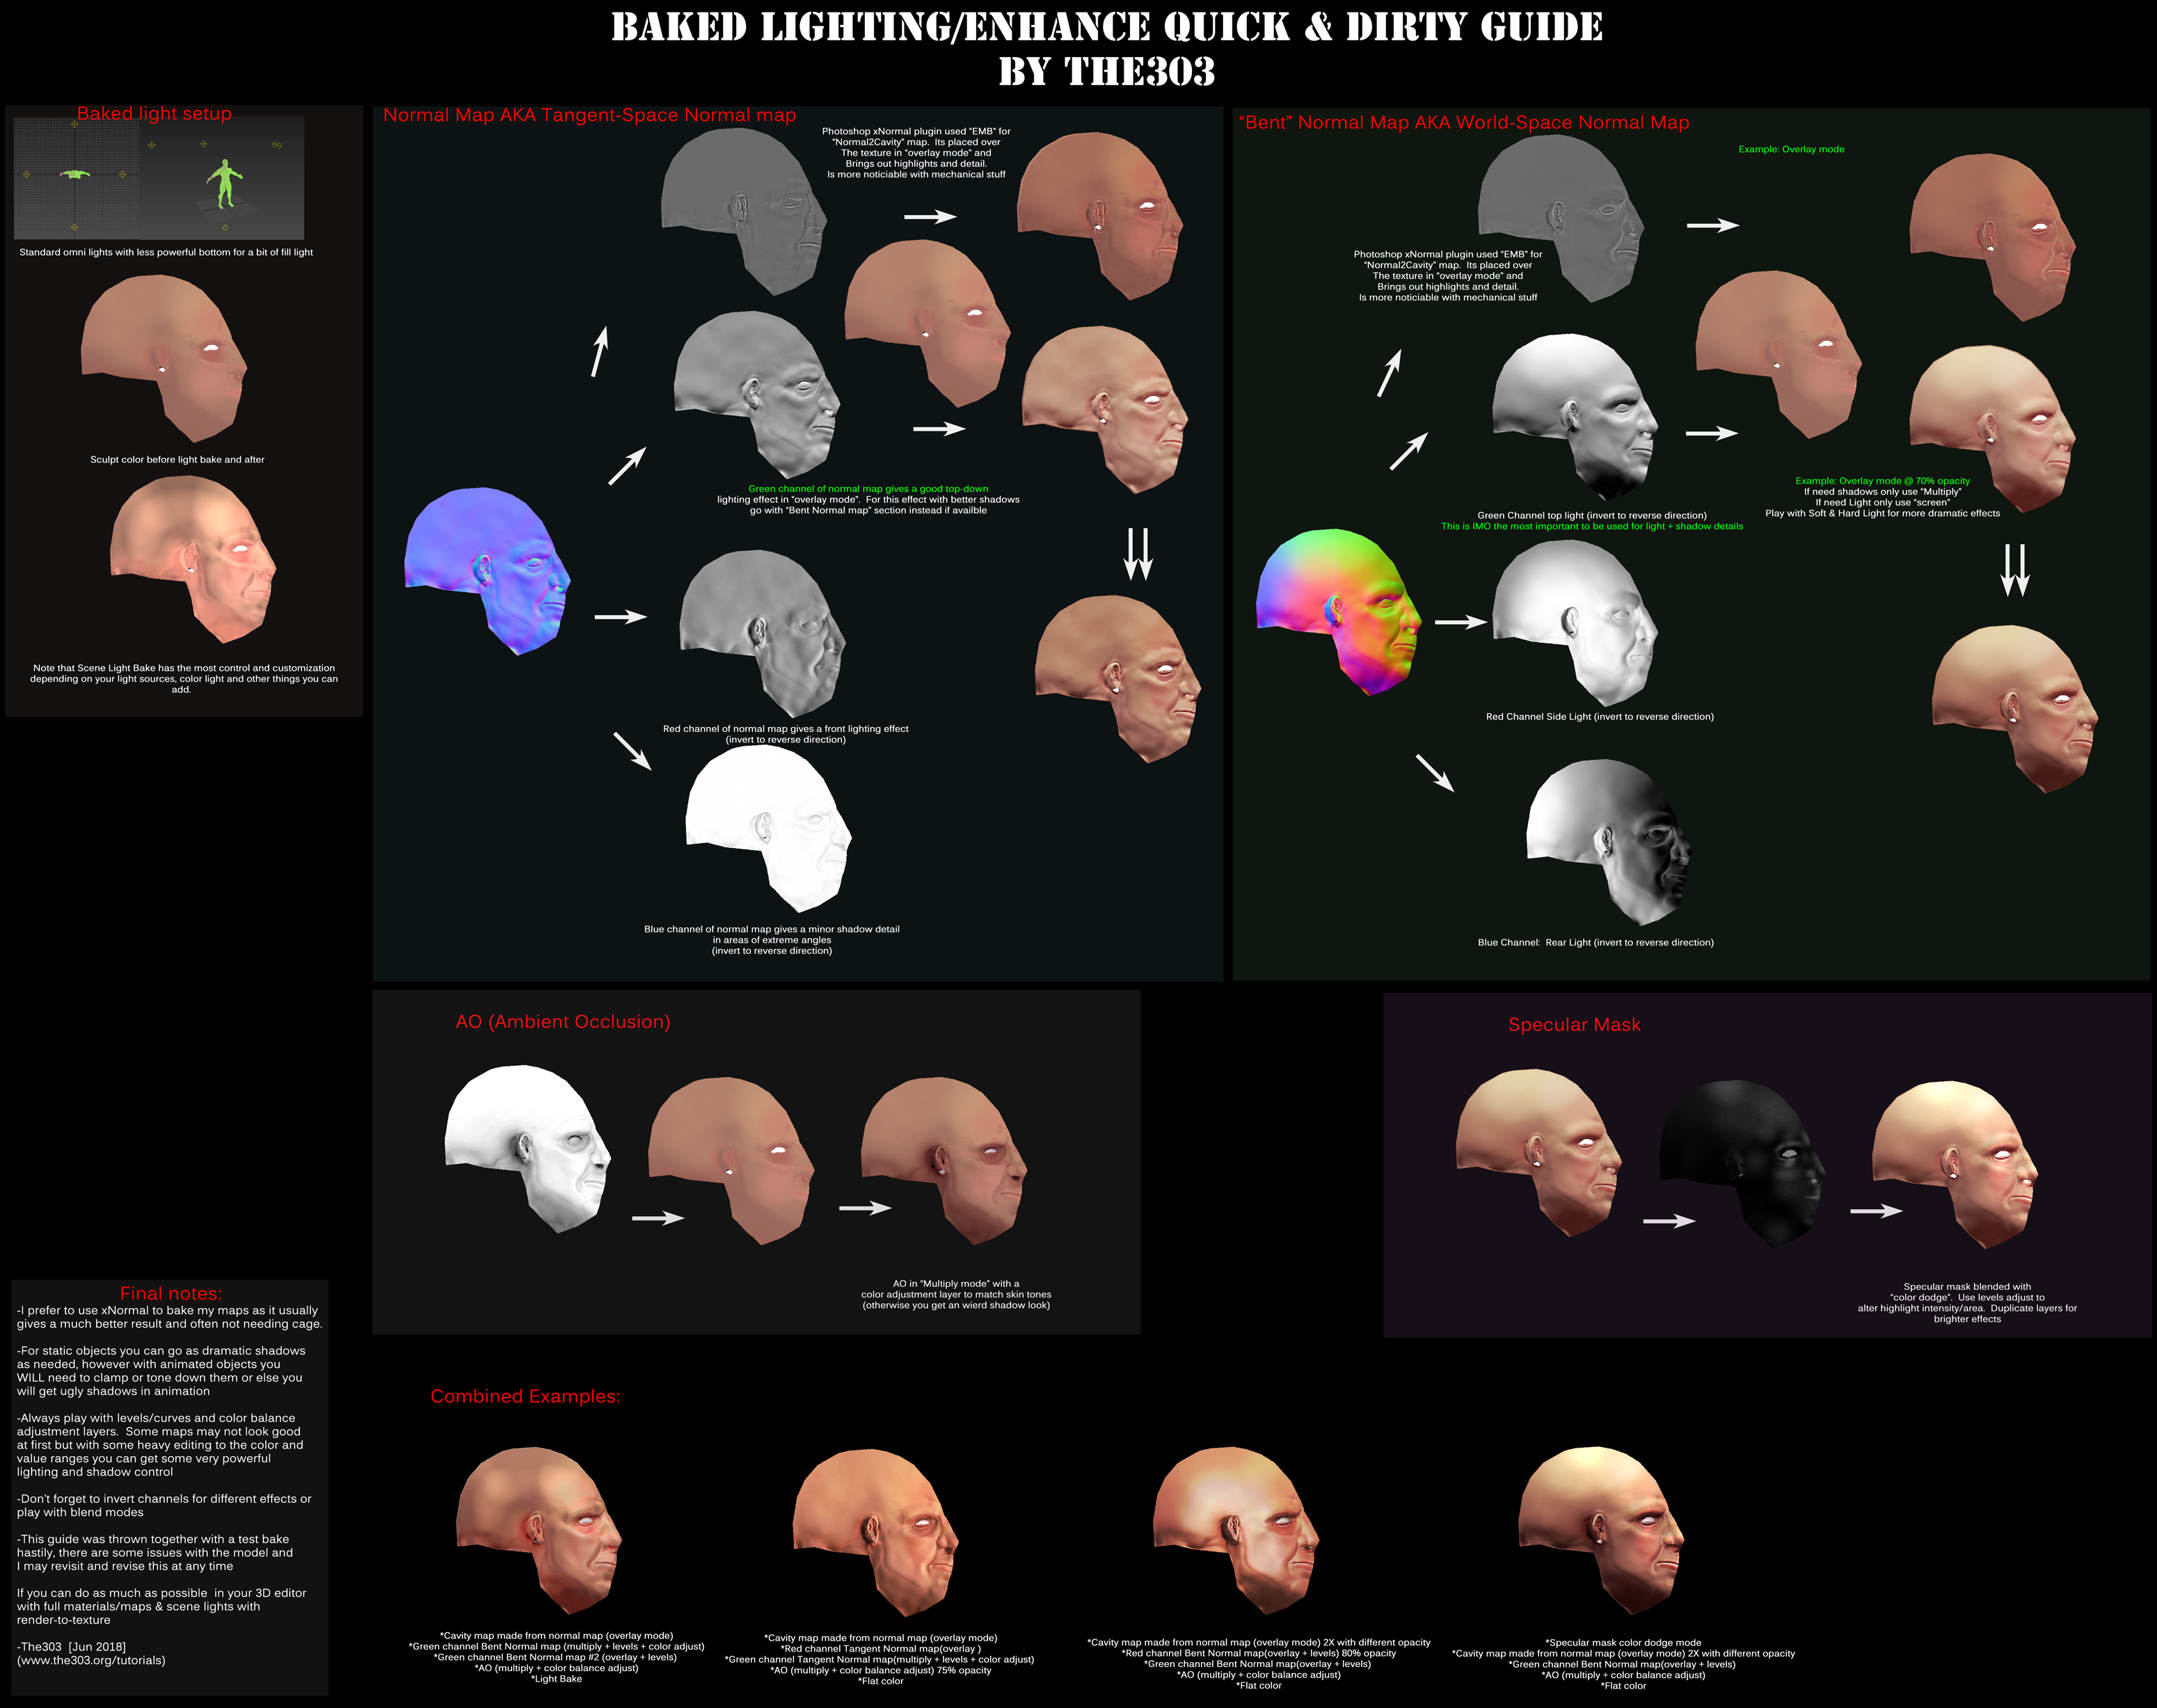
I reccomend that you do some final adjustments before you have your finished texture. What I personally like to do is load up the unlit diffuse map in photoshop, then import the baked texture, then mask off anything that is too dark and do selective edits, color corrections and sharpening. Sometimes I like to go further and load up all of the maps and do some very fine tuning such as combining with other bakes. I have made a quick and dirty guide about doing fine tuning and control with baked maps:
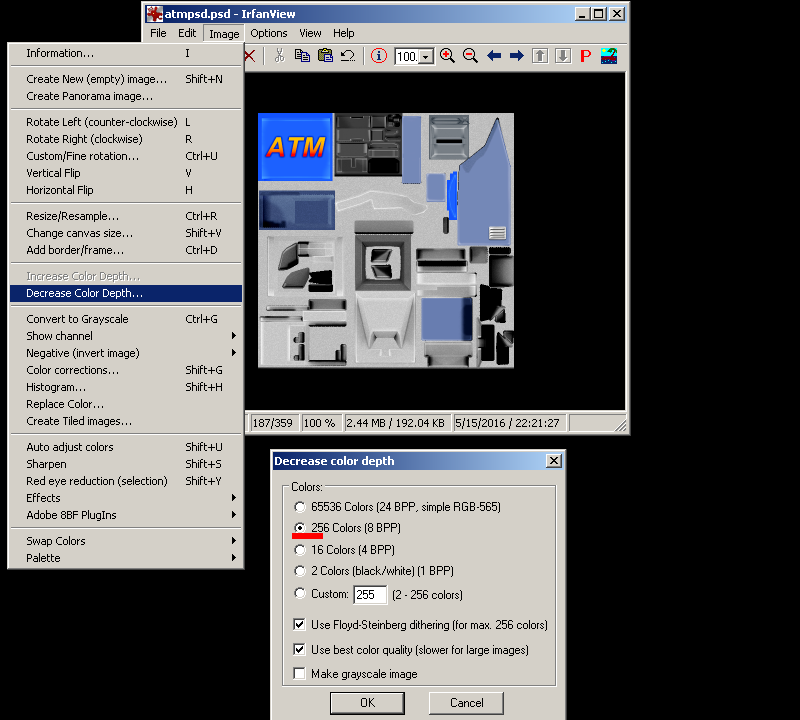
When you have your final image its time to convert the texture(s) to 8bit index. The common option for making an indexed color image is "save as 8bit", "256 colors", or "indexed".
If your program is lacking in creating a decent palette or cannot save properly, you can save out your image as a 24bit BMP and use IRFANVIEW to do the 8bit conversion. I encourage to use this way if you are using Paint.net or GIMP because ive found that 8-bit conversion in those programs tend to not reproduce accurate results.
If you have a model that needs a smooth gradient and dithering is just not acceptable for you, there is a way of getting better color range by separating your textures by general color. This may require you to modify the UVs on your model to separate images/IDs.