
INTRODUCTION
This guide is an adaptation of Shepards Zombie Panic! server guide, and edited / compiled together by The303
Contributors: Shephard, Tabajara, Wufflesan, Shadesbot, Zode, R4to0
This guide will explain how to setup a dedicated server for goldsrc games on both Linux and Windows operating systems.
Please note that if you want to host a server for a small private group (like playing with friends), consider simplifying your life a lot by hosting a listen server with the Steam Networking (P2P) feature enabled instead. The usual use case for a dedicated server is to host a public 24h/24 7d/7 or host a public event.
Warnings (!May change & add these!)

- This guide assumes you are doing everything manually by hand and not using some kind of graphical "game servers panel" and/or automated script (helpers).
- You must know your way around the command-line/terminal. The concept of "command" and "arguments" should already be familiar to you. A good server administrator/operator cannot always rely on user interfaces.
- This guide will not teach you "basic" server administration/security practices like "how to keep the system up-to-date", "how to isolate programs within an environment/user account", "how to access my server remotely through SSH/RDP in a secure way". It is assumed that the machine that will host your future dedicated server is already ready and secure.
- This guide will not teach you how to open TCP and UDP ports. For port forwarding, please refer to your router's manual. Note that some ISPs or consumer routers may not allow port forwarding at home. VPS services usually do not require this.
- This guide will not teach you how to configure your firewall(s) properly. It is assumed that you already know how to allow certain incoming/outcoming ports for certain executables.
- This guide will not teach you how to secure your server's system. You should already be familiar with best security practices like "strong passwords", "least privileges principle" and so on.
- This guide assumes that everything is done "natively" (or traditionaly if you want to call it this way). If you want to isolate/run your dedicated server in a container technology (like Docker or Podman), There is a link in Additional Resources to do that
Table of Contents:
Ports
[Linux Only] Steam Runtime
SteamCMD
Install
Configuration
Admin commands
[Optional] Metamod & AMX Mod X (AMXX)
FastDL
Troubleshooting
Additional Resources and Sven Co-op info
Ports
Note: all ports mentioned here are "incoming", not "outgoing".
As mentioned above, you will be required to open at least one UDP port and maybe more depending on your situation. The mandatory one is UDP 27015 because its the one responsible for transmitting pings and game data. Do note that if you do not like that default value of 27015, it can be changed when starting the game server later so it can be whatever you like as long as it's UDP. If you plan on hosting multiple servers in the same machine, you will need to open multiple UDP ports, the choice is yours but the "standard" is to open the next one(s).
If you want to administrate your server remotely without a third-party solution (AMX Mod X) and you don't want to physically connect to the server remotely to manipulate the server's console directly, RCON (Remote CONtrol) is used.
RCON uses the same port you specified using -port, UDP. If you want to protect yourself a bit you can add the following to your server.cfg:
sv_rcon_banpenalty 1440

sv_rcon_maxfailures 5

sv_rcon_minfailures 3

sv_rcon_minfailuretime 30
This does not apply if you are hosting your server on your own PC since you directly have access to the server console.
WARNING! RCON is an insecure protocol, do not use passwords you care about as they will be sent in plaintext, meaning anyone on your network can easily sniff this traffic. Generate a random password, create a file named "userconfig.cfg" in your gamedir/ or moddir/ (e.g., valve/userconfig.cfg, scihunt/userconfig.cfg), and add
rcon_password mydogsnamebackwards1! to it. This will load your password as the value of rcon_password each time you start Half-Life or a mod
Documentation on if you want to protect your server against cheaters with Valve Anti-Cheat (VAC) technology is here. You don't need to open any other ports for this as it uses websockets. If you want to change your default VAC port they can use -sport xxxxx command-line parameter
If you absolutely care about adding a HLTV (Half-Life TeleVision) proxy in your game server, port UDP 27020 will be required to be opened. Note that HLTV might not be suppported on your mod.
[Linux Only] Steam Runtime
There are two ways of running the dedicated server build: "natively" and using the "Steam Runtime".
"Natively" means using the system's libraries directly to run the dedicated server. The major problem with this approach is that Linux distributions doesn't agree when it comes to libraries versions, deprecation policies, locations and such. This means that you may need to risk changing your system and/or mess around with your dedicated server installation to get it running this way.
The "Steam Runtime" is a "sandboxed modified Ubuntu installation" made by Valve to fix the problems mentioned above in the "native" way. It is used by default by the Steam client on Linux and video games are likely built to target that "Steam Runtime" which is the case of the GoldSrc engine.
Downloading and installing the Steam Runtime
The latest stable default branch of the Steam Runtime can be downloaded and extracted using this command:
curl -sqL "https://repo.steampowered.com/steamrt-images-scout/snapshots/latest-steam-client-general-availability/steam-runtime.tar.xz" | tar xvfJ -
Some distributions (like Debian) might not provide cURL by default, either install it or use an alternative ("wget" in this case).
If you want to use the "beta" branch instead (same thing as running the Steam client in "beta"), it is the same command but you need to replace "general-availability" in the link by "public-beta".
A "steam-runtime" folder should appear, run the "setup.sh" script inside it and let it update the pins:
./setup.sh
SteamCMD
SteamCMD is a program developed by Valve that is basically a command-line version of the Steam client. You will need it to download a clean copy of your game in the next chapter.
On Windows, you simply download the archive from the link below, extract it somewhere and you are done.
On Linux, your distribution's package manager likely provide a "steamcmd" package that you can download and use right away but you might need to perform some pre-requirements first like "adding the 32 bits architecture" and/or "allow 'non-free' packages". You can also download the archive from the link below, extract it somewhere and you are done.
Download links, installation information and more about SteamCMD can be found on its Valve Developer Community (VDC) wiki page.
For regular Half-Life Dedicated Server App ID is 90. A list of dedicated servers is here on the VDC DSL. You can also use SteamDB to search when in doubt.
All Half-Life 1/Goldsrc games typically use appid 90, since mods are launched using default Half-Life (meaning there is no Team Fortress Classic Dedicated Server, no CS 1.6 Dedicated Server, etc).
The only exception to this are games which launched standalone, like Sven Co-op & Zombie Panic! This just seems to be house-keeping / separation of concerns on Valve's side since you can see on SteamDB that the dedicated server for Sven Co-op & Zombie Panic! is just HLDS without the /valve/ content.
Install
You can now start SteamCMD and let it update if it needs to. Please read very carefully and do not blindly copy/paste the commands below because some of them depends on your situation.
Different operating system scenario
First, SteamCMD will by default download and install everything for the same operating system as you are currently using. If you are using SteamCMD on Windows, you will be downloading apps/games for Windows. On Linux, you will be downloading apps/games for Linux.
If you are in the scenario where your server is running a different operating system as the one you are currently using, you can enter this first command and replace the "os" argument by either "linux" or "windows" to force SteamCMD to target Linux or Windows respectively:
@sSteamCmdForcePlatformType <os>
Using a different installation path
Next, SteamCMD will download/install everything you ask to by default within its own folder. Maybe you want something else that is more conveninent to you like
"C:/my_awesome_cs_server/" (Windows) or "/home/some_restricted_user_for_cs/my_cs" (Linux) or whatever. If that's the case, you can adapt and run this command:
force_install_dir <absolute path>
Downloading and installing your game of choice
Now that the situation stuff has been taken care of. We can now download the dedicated server (HLDS).
Note: if you are just making an HLDM server and not a mod you don't need to set the paramater -game. For some games like Zombie Panic! & Sven Coop which are standalone games, it is not nessacary to download HLDS as it is packaged differently to include both a minimalist Half-Life: Dedicated Server (HLDS) installation and Zombie Panic! / Sven itself.
When you are ready, enter this command to login "anonymously" on Steam:
login anonymous
Once you're logged in, you can download the Dedicated Server tool (in this example HLDS), its Steam Application ID is "90". Since this is a "fresh" installation, it is recommended to use the optional "validate" argument to prevent corrupted files.
app_update 90 [validate]
An example of a counter-strike install would be:
force_install_dir C:/my_awesome_cs_server/

app_set_config 90 mod cstrike
app_update 90 validate
Warning! When updating your server later, it will overwrite anything custom so its suggested to use game_addon instead (mentioned later)
We're finished with SteamCMD, you can now logout from Steam and close SteamCMD properly by running these commands:
logout
quit
If you haven't done it already, now is a good time to perform all the required tasks such as "opening ports" and "firewalls configuration" (as already mentioned in the "Introduction" chapter above). If you already done it, this is also an opportunity for you to double check. VAC is enabled by default, but if for any reason to disable it there is -insecure command.
You can now test your Dedicated Server by starting it with:
# Linux

$STEAM_RUNTIME_PATH/run.sh ./hlds_run -console -game cstrike +maxplayers X [-port Y] +map z


# Windows

hlds.exe -console -game cstrike +maxplayers X [-port Y] +map z
Some explanations about the command and arguments:
hlds_run is the Linux dedicated server launcher script, "hlds.exe" is the Windows binary.
-console is only useful for Windows, it tells to not create a graphical user interface and prefer a simplier console window instead. This might not be needed on Linux but still good to keep just in case.
-game cstrike is required because you want your chosen mod dedicated server, not a Half-Life: DeathMatch (HLDM) one. In this example Counter-Strike.
+maxplayers X is the maximum amount of clients (players and bots) allowed on your server where X is said amount. Keep it reasonable for gameplay/performance reasons.
-port Y is only required if you want/have to use another UDP port than the default 27015 (re-read Introduction chapter if you don't understand this part).
+map Z is the "starting" map whenever your server (re)start. It could be an official map like "de_dust2" or any other one.
+servercfgfile myconfig.cfg allows you to set a custom server.cfg file
-addons is to allow loading content from the game_addon (e.g., valve_addon) directory. Put any custom content in here to keep it separate from default game content (useful for backing up just your servers custom maps/models/etc)
Assuming all the pre-required (ports/firewall) stuff and the setup has been done correctly. You should be able to start your game and join your own server. If you can't see your server in the in-game/Steam server browser, you can also try to connect directly by typing this command in the game's console:
connect <IP address>:[port]
An example of a very minimal install of Team Fortress Classic:
steamcmd.exe

force_install_dir C:\tfc\

login anonymous

app_set_config 90 mod tfc

app_update 90 validate

quit

cd C:\tfc\

hlds.exe -game tfc +map 2fort
or if you wanna skip dealing with steamcmd's console:
steamcmd.exe +force_install_dir C:\tfc +login anonymous +app_set_config 90 mod tfc +app_update 90 validate +quit
Configuration
You have a dedicated server and you have confirmed by testing that it works. Good, you can now configure it.
Server configuration is stored in the "<game install dir>/server.cfg" file
(example: cstrike/server.cfg), please open and edit it with an appropriate text editor and not something "weird" like Wordpad, Office Word or LibreOffice Writer.
Below is an example of such server configurations, you are free to copy/paste/adapt it to your own needs:
Remember earlier the mentioned +servercfgfile myconfig.cfg for loading any other custom configs you have
HLDM
CS1.6
Zombie Panic!
Sven Co-op
NOTE:HL 25 added some additional config files which will be executed on each map change. They are executed in the following order:
1. maps/mapname_load.cfg (when the server has changed levels and the map has loaded)
2. maps/mapname_server.cfg (when the server has changed levels and the map has loaded)
3. maps/mapname_unload.cfg (when the server is changing levels and about to load the next map)
4. +mapchangecfgfile "yourconfig.cfg" (when the server has changed levels and the map has loaded)
5. server.cfg (or +servercfgfile)
Remember this order as last executed wins, meaning if you set foo = bar in mapname_load.cfg, then set foo = notbar in server.cfg, once players load in it will be foo = notbar.
The above cvars only exist if you are running a Half-Life 25th anniversary server (the default when downloading from steamcmd). If you specify -beta steam_legacy when downloading from steamcmd there is no handling of mapname_*.cfg
Q: Where are all the network settings like "rate" and all?
A: Not included here because:
1) default values should be fine (unless you want "competitive settings", pointless for a games like Zombie Panic!)
2) depends on too many individual factors and
3) any mistake with these (including blindly copying/pasting random values from the Internet without double checking them) and you risk ruining the experience for players.
Admin commands
Now we have our server running, now for some administration basics and commands:
addip <in> <ipaddress>: adds an ip address to the filterban list - * use 0 minutes to make the addition permanent
banid <minutes> <SteamID/uniqueid>: bans a player from a server using their SteamID/uniqueid - get this uniqueid from the "users" command - 0 minutes is a permanent ban
banid <minutes> <SteamID/uniqueid> kick: bans AND kicks a player from a server using their SteamID/uniqueid - get the uniqueid from the "users" command - 0 minutes is a permanent ban
filterban: 0 toggles ip banning - * 1 is 'on', 0 is 'off'
kick # <SteamID/uniqueid>: kicks a player from a server using their SteamID/uniqueid - get the unique from using the "users" command
kick <player>: kicks a player from a server using their name. It is strongly recommend putting the name between double quotes. Main reason is that some people likely have spaces and/or special characters in their name and failure to do so will make GoldSrc confuse as multiple arguments instead of one (<player>).
Example: kick Dr. Breen will fail because it will try to kick a player called "Dr." (missing the space and "Breen") but kick "Dr. Breen" will work.
listid: lists the SteamIDs/uniqueids in the banlist
listip: lists the IP addresses in the IP ban list
removeid <SteamID/uniqueid>: removes SteamIDs/uniqueids from being banned on a server
status: Provides the following:
Hostname of the server
The version of the game running on the server
The IP address/port it is running on
Current map running
Players on server currently and max
A list of all players with their corresponding userid's (#'s generated by server), SteamIDs/uniqueids as well as those player's frag, time, ping, loss and adr information.
users: lists all players with their corresponding userid's (#'s generated by server) and SteamIDs/uniqueids
writeid: writes unique IDs to banned.cfg
writeip: writes ip addresses to listip.cfg
[Optional] Metamod & AMX Mod X (AMXX)
At this point, your dedicated server should be operational and ready to go.
However, you might want to extend your server's abilities with community made plugins. Administrating a server through server console or RCON (Remote CONtrol) can quickly become tiresome and the need for an administration system and menus quickly rises.
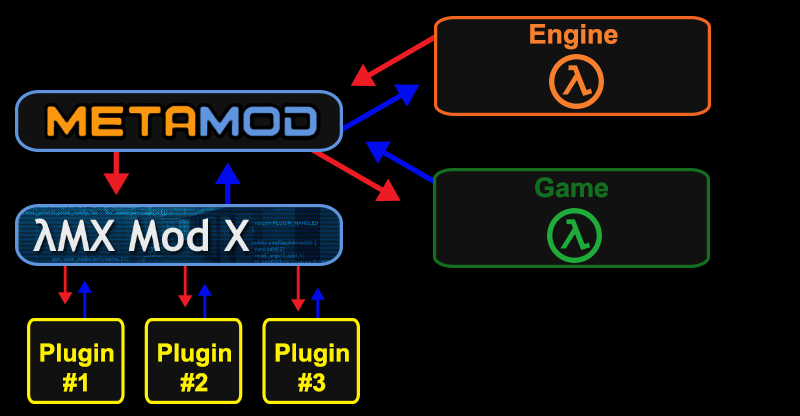
AMX Mod X is the popular choice to meet these needs. However, AMX Mod X won't be able to run by itself because it's an "addon" for Metamod so you will need to download and install it too. If you are familiar with Minecraft Java Edition modding, Metamod is the "mod loader" like Fabric/Forge, AMX Mod X is the mod itself.
To give a quick visual on how Metamod works, we first see the default the engine just talks to the game (which is the server dll):

metamod is installed in between, which uses the exact same interfaces, the engine thinks metamod is a game, and the game thinks metamod is the engine, it now intercepts calls between the two and exposes its own addon API:
 AMXX is installed as an addon to metamod and then AMXX is loaded with AMXX plugins:
Metamod
We can't use the original Metamod for two reasons:
1) it has been abandoned by its original developer years ago so it's no longer up-to-date and
2) support for games/mods is hardcoded within the binary. So unless you are highly motivated to grab the source code, fix it for modern toolchains and add your specific mod support in the code yourself, we need another option.
And this is where Metamod-P comes in, it's a "fork" (clone) of the original Metamod which still has the #1 support problem but it's a bit more modern. However, it eliminates problem #2 by eliminating the hardcoded games/mods support and perform dynamic analysis of the game/mod server binary which is what we need.
So go to Metamod-P's website, download the latest binary for your server's operating system and extract it somewhere. On Linux, you will get a "metamod.so" file, on Windows, it's "metamod.dll" instead. From this point, this will be refered to as "Metamod binary".
Shut down your dedicated server if it's still running and create the following folder hierarchy in its installation:
<game install dir>/addons/metamod/dlls
(example: zp/addons/metamod/dlls for Zombie Panic!)
Move the Metamod binary within the newly created
"<game install dir>/addons/metamod/dlls" hierarchy, then append
-dll addons/metamod/dlls/metamod.so (for Linux) or
addons\metamod\dlls\metamod.dll (for Windows) to your startup line.
Start your dedicated server again, if you get an error upon starting, you placed the Metamod binary at the wrong location or forgot to do so. If the server starts but you get nothing by typing the "meta" command in the server's console, you forgot to edit the same file or it was overwritten by something else. If you see a "welcome message" from Metamod-P in the server's console, that's a good start, you can confirm it works by typing "meta" and even "meta version" commands. Shut down the server when you're done.
AMX Mod X
Now that Metamod is taken care of, we can move to AMX Mod X itself, head to its download page and grab the core base package matching your server's operating system. Once the archive is downloaded, extract it within the "<game install dir>" folder of your dedicated server's installation. To confirm the correct hierarchy, you should see two folders in "<game install dir>/addons": "amxmodx" and "metamod". If not, you extracted the archive in the wrong location.
Now we need to tell Metamod to load AMX Mod X, go in the "<game install dir>/addons/metamod" folder and create an empty text file called "plugins.ini". Make sure it has the INI extension (and not TXT) otherwise it will not work.
Open this newly created file (again in a decent text editor), on Linux, you add this line:
linux addons/amxmodx/dlls/amxmodx_mm_i386.so
On Windows, you add this line instead:
win32 addons\amxmodx\dlls\amxmodx_mm.dll
Save and close the file. Start the server again and double check that AMX Mod X works, it should also print a welcome message when starting the server and you should have access to the "amxx" command. If not, you've done something incorrectly.
To configure AMX Mod X itself, refer to its wiki documentation.
Q: What kind of AMX Mod X plugins can I use?
A: In theory, plugins that works on all mods should also work unless they are doing something very specific, don't be surprised if the plugin fails in this scenario.
Q: Can I use Half-Life DeathMatch (HLDM) plugins?
A: Again, depends on what the plugin is doing. If it's about manipulating Half-Life specific entities like health/H.E.V. chargers, RPG, Gauss gun and all, your mod will likely break.
Keep in mind that while mods like for example; Zombie Panic! is still a modification for Half-Life 1, several changes "under the hood" have been made for its needs. So once again, do not be surprised if a plugin do not work unless it's adapted for your mod of choice.
FastDL
FastDL is a way to get maps, assets, other custom server content to your players quickly and FastDL supports optional compression feature in the form of "Gzip". Having a properly FastDL server configured is essential as Goldsrc will never transfer files above 20KB/s (this is an engine limitation, one which is unlikely to ever be removed) - and that is only if you set sv_allowdownload 1, as if it is set to 0 the server will not transfer anything to the client in the event FastDL is misconfigured, and players cannot connect without installing the map manually.
Even with a properly configured FastDL server you are likely to run into issues as many map authors tend to forget content they used (other sprites, skies, etc), or may generate res files without taking into account case sensitivty, but these files may exist on the server, in which case the server will start transferring them to clients very slowly. There is also an alternative tool for FastDL management at the bottom of this section.
1) Grab your maps resfile "mapname.res" (if you DON'T have a resfile, use RESGUY to generate one), then if using the optional Gzip on your files, rename them to lowercase then you can upload them. A guide on using Gzip can be found here.
2) Upload your files to your website/host of choice for example
"https://myfastdl.com/fastdl/example/"
this is usually done via FTP or your webhosts web upload panel.
3) Open your servers "server.cfg" file and enter these commands:
sv_downloadurl "https://myfastdl.com/fastdl/example/"

sv_allowdownload 1
4) Restart your server. Verify fastDL by seeing if players can download your maps (TODO other way of verifying without others??)
Verifying FastDL:
Using developer 1 can be useful when debugging FastDL isses, since it will tell you if anything is missing. Here is an example of a good config:
Connecting to 198.51.100.10:27015...
Connection accepted by 198.51.100.10:27015
* Privileges set

BUILD 4336 SERVER (0 CRC)
Server # 1
Serverinfo packet received.
Clearing memory
Remote host:  My Cool Half-Life Server
Spooling demo header.
Using https://myfastdl.com/fastdl/example/ as primary download location
Verifying and downloading resources...
Requesting HTTP download of https://myfastdl.com/fastdl/example/devtextures_v3.wad.
Requesting HTTP download of https://myfastdl.com/fastdl/example/gfx/env/drcrash2bk.tga.
Requesting HTTP download of https://myfastdl.com/fastdl/example/gfx/env/drcrash2dn.tga.
Requesting HTTP download of https://myfastdl.com/fastdl/example/gfx/env/drcrash2ft.tga.
Requesting HTTP download of https://myfastdl.com/fastdl/example/gfx/env/drcrash2lf.tga.
Saved https://myfastdl.com/fastdl/example/devtextures_v3.wad to disk
Requesting HTTP download of https://myfastdl.com/fastdl/example/gfx/env/drcrash2rt.tga.
Saved https://myfastdl.com/fastdl/example/gfx/env/drcrash2bk.tga to disk
And looking at the NGINX logs everything was grabbed successfully:
 "GET /fastdl/example/devtextures_v3.wad HTTP/1.1" 200 144402 "-" "Valve/Steam HTTP Client 1.0 (70)"
 "GET /fastdl/example/gfx/env/drcrash2bk.tga HTTP/1.1" 200 23436 "-" "Valve/Steam HTTP Client 1.0 (70)"
 "GET /fastdl/example/gfx/env/drcrash2rt.tga HTTP/1.1" 200 26656 "-" "Valve/Steam HTTP Client 1.0 (70)"
 "GET /fastdl/example/gfx/env/drcrash2dn.tga HTTP/1.1" 200 903 "-" "Valve/Steam HTTP Client 1.0 (70)"
 "GET /fastdl/example/gfx/env/drcrash2up.tga HTTP/1.1" 200 50213 "-" "Valve/Steam HTTP Client 1.0 (70)"
 "GET /fastdl/example/gfx/env/drcrash2ft.tga HTTP/1.1" 200 23773 "-" "Valve/Steam HTTP Client 1.0 (70)"
 "GET /fastdl/example/gfx/env/drcrash2lf.tga HTTP/1.1" 200 33336 "-" "Valve/Steam HTTP Client 1.0 (70)"
And an example of files missing from FastDL/FastDL misconfigured with developer 1 view:
Connecting to 198.51.100.10:27055...
Connection accepted by 198.51.100.10:27055
* Privileges set

BUILD 10211 SERVER (0 CRC)
Server # 2
Serverinfo packet received.
Clearing memory
Remote host:  My Lame Half-Life Server
Couldn't find map maps/psilos_5arrows.bsp, server will download the map
Spooling demo header.
Using https://myfastdl.com/fastdl/example/ as primary download location
Verifying and downloading resources...
Requesting HTTP download of https://myfastdl.com/fastdl/example/sprites/but2.spr.
Requesting HTTP download of https://myfastdl.com/fastdl/example/sprites/upjump.spr.
Requesting HTTP download of https://myfastdl.com/fastdl/example/sprites/worm2.spr.
Requesting HTTP download of https://myfastdl.com/fastdl/example/maps/psilos_5arrows.bsp.
Failed HTTP download of https://myfastdl.com/fastdl/example/sprites/but2.spr.
Failed HTTP download of https://myfastdl.com/fastdl/example/sprites/upjump.spr.
Failed HTTP download of https://myfastdl.com/fastdl/example/sprites/worm2.spr.
Failed HTTP download of https://myfastdl.com/fastdl/example/maps/psilos_5arrows.bsp.
NGINX view:
"GET /fastdl/example/sprites/but2.spr HTTP/1.1" 404 20801 "-" "Valve/Steam HTTP Client 1.0 (70)"
"GET /fastdl/example/sprites/upjump.spr HTTP/1.1" 404 20801 "-" "Valve/Steam HTTP Client 1.0 (70)"
"GET /fastdl/example/sprites/worm2.spr HTTP/1.1" 404 20801 "-" "Valve/Steam HTTP Client 1.0 (70)"
"GET /fastdl/example/maps/psilos_5arrows.bsp HTTP/1.1" 404 20801 "-" "Valve/Steam HTTP Client 1.0 (70)"
The following errors are benign and can be ignored (these show up because steam is checking if the steam client is running, which is not required for headless dedicated servers)
[S_API FAIL] SteamAPI_Init() failed; SteamAPI_IsSteamRunning() failed.
CAppInfoCacheReadFromDiskThread took 7 milliseconds to initialize
dlopen failed trying to load:
/home/container/.steam/sdk32/libsteam.so
with error:
/home/container/.steam/sdk32/libsteam.so: cannot open shared object file: No such file or directory
FastDL-Desktop
There is also a new desktop app called "FastDL-Desktop" for validating, installing, compressing, publishing, and rolling back FastDL packages. Its github page can be found here:
https://github.com/MadHLDM/FastDL-Desktop
Troubleshooting
My server is not visible in the Steam and/or in-game server browser / I can't join my server because "STEAM validation rejected"
This happens because the GoldSrc engine check which game is being used and tries to set the correct Steam Application ID based on a hardcoded list within the GoldSrc engine binaries. Since that list contains only Valve official titles and cannot be modified without access to the engine's code, it fall back to Half-Life 1 itself.
You can fix this by editing (or creating if it's not already present) the "steam_appid.txt" file in your server's installation. Make sure the first line is exactly "90" without any double quote and space, and make sure the second line exists but it's an empty one. Save the file, make it "read only" and restart your server.
For standalone games for example Sven Coop it would be "225840" , for Zombie Panic! "3825360"
How do I use Steam Workshop content?
The Steam Workshop integration in games like Zombie Panic! has been designed specifically for clients and Peer-2-Peer so dedicated servers cannot use the Steam Workshop "as is". You will have to subscribe to the desired Workshop item(s), upload it (those) to your server(s) and your FastDL (highly recommended to have one) server.
On Linux, I'm getting errors related to Steam API like "unable to locate a running instance of Steam", ".steam/sdk32/steamclient.so"...
This error is normal and can be ignored; Steam API tries to load normal Steam client library first from ~/.steam/sdk32/, then it fallback to local supplied steamclient.so that comes with the game where the executable is.
Additional resources
Official Steam Setting up a Steam Half-Life Dedicated Server (HLDS)
Running a Half-Life Dedicated Server with Docker
How to run Sven Co-op Dedicated Server: Also check the links like advanced for additional info
Sven Coop Peer-2-Peer Guide: Creating a quick small server for your friends without any port forwarding or firewall configuration at all.
Sven Coop: Loading Angelscript plugins on your server
Sven Coop Plugin Manager: small Windows GUI utility to view and manage Sven Co-op server plugin entries (enabled/disabled) stored in the game's plugin files.
BSP Parser: Sven Co-op server tool to post-process downloaded map packs to make them more compatible with their linux servers.